Basic product management
![]() Out of all the features of our application you will probably use product management the most. Unless you are creating a website without product catalog. This section covers the easy part, but it is important to understand the basics.
Out of all the features of our application you will probably use product management the most. Unless you are creating a website without product catalog. This section covers the easy part, but it is important to understand the basics.
You can find product management at Management > Products.
Product management works on desktop and also on tablets and smartphones. For best comfort we recommend a wide desktop screen and a mouse / keyboard combination. On desktop, you can make the working area bigger by hiding the left menu. Click the slide left icon for this.
Adding a new product
Click the Add product icon.
When done, click the Save button in the bottom right corner to save your hard efforts.
Basic product settings
You can use the TAB button to move the cursor to the next form field.
- Article (product code)
- This is a unique name or number that identifies the product. This identifier will be shown in the shopping cart, on invoices and in emails.
The product code will not be displayed on your online store, unless no name (see below) has been entered. If you want to display the product code on the website, enter it in the name field or leave the name empty.
It is advisable to provide a unique code for each product, so that you know which products have been ordered after an order. Keep product codes simple and avoid special characters.
Product codes are used as identification in emails, packing slips, invoices, discounts, search functions, the import function and the API. Keep them as simple as possible so that they are easily identifiable and / or can be processed automatically.
The software allows for entering duplicate article codes, there will only be a warning. But we strongly recommend against using duplicate identifiers. It is possible because otherwise we get a lot of supports tickets with "I can't save my products". - Category
- For more information about categories, see the categories and subcategories section. A frequently asked question to our support is why the category drop down box for product management is empty or why Unnamed is displayed on the website. The answer is: you have a multilingual shop and there's no category name filled in for this language.
- Price
- This can either be a number or a phrase, such as "Price is negotiable". A currency sign is added automatically. Don't include a currency symbol: simply enter a numeric value if you want the total amount to be calculated at the checkout.
OK: 4.99 or 1,50 or 250
Not OK: €4.99 or 25 dollar
Prices are shown on your website in a way that is most obvious for your visitors. The number of decimals, separation character for decimals and thousands and the currency symbol all depend on the language and currency combination.
A frequently asked question to our support is "why is the price of a product in my shopping cart not calculated correctly?". The answer is: the price is not numerically entered or you have added a currency symbol. - Inventory
- Use this field if you want to keep track of product stock. If you don't want to do this: stay with the default setting. If it's a unique product, enter 1. The stock is automatically updated if an order is placed in your shop. For an infinite stock or for digital products, disable stock management or enter 0 in combination with the product status Available. If there's no stock left, change the status of the product to Sold Out.
| Stock value | Meaning | Indication |
|---|---|---|
| 1 | Unique product | Limited Stock |
| < 10 | Less than 10 | Limited Stock |
| >= 10 | More than 10 | In stock |
| 0 | Infinite stock, dropshipping or digital product | In stock |
| 0 + Status Sold Out | Depleted stock | Sold out |
Product statuses
- Available
- The product will be shown in your online store and can be purchased. This is the default.
- Available, but can not be purchased online
- The product will be shown in your online store but there is no button for purchasing.
Visitors need to contact you or go to your physical store to purchase the item. - Pre-order
- The product can be purchased normally. There is no stock indication.
Use the product description (see below) if more information about inventory and delivery is necessary. - Sold out
- This status is automatically set when the stock is exhausted.
The product remains visible in your shop but can not be purchased. - Invisible
- The product is still available in product management but it will not be shown on the website.
It can only be sold by you using the Point Of Sale. - Only available for logged in customers
- The product does not appear in your online store directly but is shown after a customer logs in.
Search engines will not index this product as it is not visible by default. - Price only visible for logged in customers
- The product is shown in your online store but the price is not shown. Instead the message Price only visible for logged in customers is shown.
When a customer logs in, the price will be visible. - Customer has to choose a variation first
- The product will be shown in your online shop but there is no button for purchasing. This status is intended for situations where you want a customer to choose a product variation instead of buying the main product.
It can also be used without variations if you simply don't want this product to be purchased and also don't want the text "Available, but can not be purchased online" as the product status. - Do not display product status
- The same as Available but no product status is shown.
Click the + Add option in the status selection to add a personalized product status. A new window will open were you can add up to 10 personalized product statuses. If your online store is multilingual, don't forget to add the status names for each language. After saving, you will need to open a product again to get the updated list with the new personalized product statuses.
Adding product photos

Quality photos are important as they will attract the attention of your visitors. Click the Upload icon to select photos from your hard disk.
- File formats: .jpg, .jpeg, .gif, .png
- Maximum file size: 25MB
Photos are automatically scaled proportionally for fast and optimal viewing on the web. This way everything stays consistent and the photos are displayed correctly on smartphones and tablets.
Use the module High quality product photos if you want to set the dimensions of the product photos yourself.
Always use the same dimensions for your photos. This way, your website stays consistent and does not give a messy impression. Upload photos that are big enough and have a good quality.
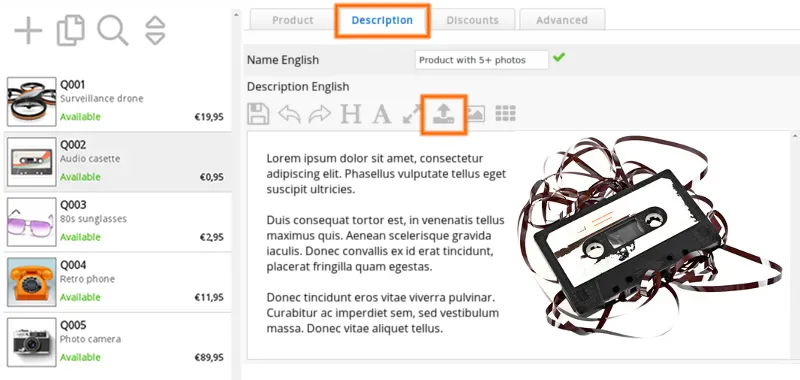
Each product has a main photo and 4 extra photos. If you want to add more photos, you can use the product description:

Product names and descriptions
Click the Description tab in product management.
- Name
- The name of your product. This is what the customer will see on your website in the product lists and on the product detail pages.
If this field is left blank, the Article code will be displayed instead. - Description
- Describe your product as detailed as possible.
You can add extra photos by using the Upload icon in the text editor.
If the text field is too small, click the Full screen icon to expand it. Click the icon again to shrink it.
Both the Name and Description text will be indexed by search engines. Choose fittings names for your products and describe them extensively. Include keywords but do not exaggerate. It's also recommended to add a few photos in the product description so it's not only boring text.
Don't try to trick search engines by stuffing keywords or by making the keywords the same color as the background.
Never copy text from other sources!
Search engines are smart nowadays and will penalize (de-list) you.
Avoid copying text from Microsoft Word or from other websites directly into the description field. This could introduce alien HTML codes (cool name) into the description which can disturb with your website layout. If you want to copy text with layout: you can copy it first into Notepad and then copy the unformatted text to the description field. The text editor will also remove HTML-markup after pasting for this reason.
Don't forget to scroll down if you have multiple languages. You can enter names and descriptions in all languages.
Updating products
![]() After you have added products you will find your products in the product list on the left side. Click a product to update it.
After you have added products you will find your products in the product list on the left side. Click a product to update it.
There are several more ways for updating products:
- Product management (described on this page)
- Copy products in product management
- Quick edit feature in product management
- Bulk operations
- Import feature
- API
We describe them later in this wiki.
Deleting a product
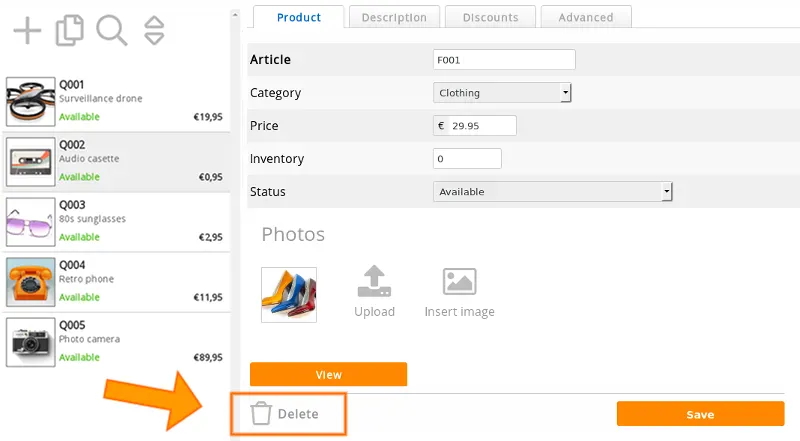
- Choose a product in the product list and click the Delete icon at the bottom left.
Deleting a product will delete the product, all its variations and photos.

Be careful: it's not possible to restore or undelete a deleted product.
Frequently asked questions about basic product management
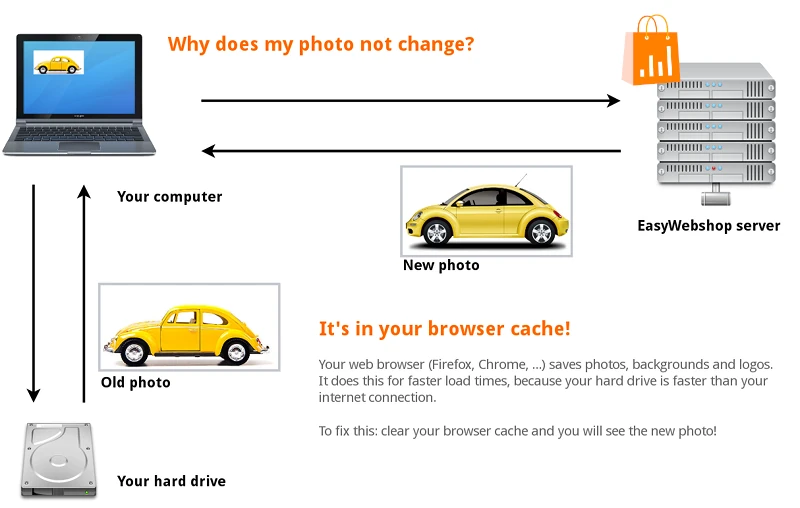
- Why do product photos not change?
- This is usually because the old photos are still in the cache of the web browser. A web browser (Firefox, Google Chrome, ...) saves web pages and images on your hard disk. This way, on your next visit, the page will load faster. When you visit the page, you will see the old version of the photo on your hard drive and not the live version on your website.

To solve this: navigate to the shop page and click Refresh page or Reload page.
You can also use the shortcut keys: F5 or CTRL + R (Command + R on Mac). The most recent version of the web page is now loaded.
In some web browsers you will have to manually clear the cache in the settings of the web browser. Where to find this depends on the web browser. Consult the help feature of your web browser for this. It's out of the scope of this wiki.
Other possible reasons why you do not see changes:
- You are viewing a wrong website or webpage - Why do products automatically change to the "Sold out" status?
- The software will automatically update the stock when an order is placed. If the stock reaches 0, the product status will change automatically to Sold out.
If you don't want this to happen: select Disable stock management (infinite stock) or simply set the stock to 0 in combination with the product status Available. The software will now assume that there's an infinite stock and will never update the product status automatically. - I received an order but I can't distinguish which products were ordered!
- Please use unique article codes. This way, you will always know which products were ordered.
Next page: Advanced product management
- Introduction
- Product management
- Online store configuration
- Account and shop settings
- Payment methods and Payment Service Providers
- Invoices and Terms & Conditions
- Setting shipping costs
- Discounts and surcharges
- Registering and transferring domain names
- Multilingual shop
- Connecting to external platforms
- Personalized web addresses
- Managing multiple webshops (Multishop)
- Automatic emails to customers
- Designing a beautiful layout
- Order management
- Marketing
- Modules
- Backups and exporting data
- Email and web mail
- Administrator accounts
- High quality photos
- Two-factor authentication
- Labels
- META tags - Website verification
- Live chat
- Slideshow
- Visitor analysis - Google Analytics
- Filters
- Point Of Sale (POS)
- Form fields
- Digital or virtual products
- Symcalia reservation system
- Guestbook
- Contacting the helpdesk